Making Pizza
These recipes make the "Margherita" style pizza. Each dough recipe makes four pizzas that are at least 10 to 12 inches in diameter. If using a rectangle baking stone instead of the more square-ish pizza stone, the pizza dough will be stretched into an oval shape.
A baking stone is typically 12 inches by 14 inches and a half-inch thick. A quality pizza stone is 16 inches by 18 inches and 3/4 inch thick.
It's best to stretch the dough by hand when making a pizza. A rolling pin "blisters" the dough, causing the dough not to bubble up as much when baking. A rolling pin can make the final crust tougher. When stretching by hand, the dough should be thicker along the edges.
Ingredients are weighed with a digital scale.
100% All-purpose Flour
This dough will be very easy to stretch by hand, and the thickness of the dough in the middle of the pizza can be made as thin as paper or a credit card.
Ingredients:
- all-purpose flour : 550 grams
- water : 360 grams
- fine-grain sea salt : 11 grams
- dry active instant yeast : 4 grams or 1 teaspoon
I use King Arthur all-purpose flour. Bread flour is recommended often, but I've not tried it.
White Whole Wheat Flour
If you want a little more flavor in the crust, then incorporate some whole grain flour, such as rye, spelt, or whole wheat.Too much whole grain flour, however, will make the dough difficult to stretch when shaping the pizzas.
This recipe uses white whole wheat flour.
Since whole grain flour has less gluten and less stretching ability, this recipe uses more total flour, so that the same size pizza can be made. The crust will be a little thicker and chewier, but the flavor is much better.
This dough can still be stretched by hand, but it won't stretch as easily as the 100 percent all-purpose flour recipe. It may take you a little longer to shape this dough.
Whole wheat flour is more absorbent than all-purpose flour, so a greater percentage of water is used in this recipe.
Ingredients:
- all-purpose flour : 500 grams
- white whole wheat flour : 150 grams
- water : 455 grams
- fine-grain sea salt : 13 grams
- dry active instant yeast : 5 grams
Most of the time, whole wheat flour is made from red wheat. But white whole flour is made from a type of wheat that lacks the red pigment, which gives red whole wheat its grainy, somewhat bitter, "healthy" taste. Some people dislike the grainy taste of red whole wheat.
White whole wheat flour is less known among home bakers. The taste is much milder than red whole wheat. But white whole wheat contains the same nutritional value as red whole wheat. Because of its milder flavor, white whole wheat is a good way to sneak whole grain healthiness into baking foods.
I use King Arthur white whole wheat flour.
I have not tried the regular red whole wheat flour in a pizza recipe. Usually, the word "red" is not included on a package of whole wheat flour. The package may only say "Whole Wheat."
But a white whole wheat flour package will be clearly marked with "White Whole Wheat."
Spelt Flour
We bought spelt "berries" at the Phoenix Earth Food Co-op, and we milled our own spelt flour at home, using a Vitamix. It took about 40 seconds to ground the spelt berries into a fine-grain flour.
Spelt is a whole grain. It contains less gluten than whole wheat, so this recipe contains more water and flour, but it still makes four pizzas.
Ingredients:
- spelt flour : 180 g
- all-purpose flour : 540 g
- water : 500 g
- fine-grain salt : 14 g
- dry active instant yeast : 7 g
Spelt flour seems less absorbent than whole wheat, so the dough will be a bit stickier or wetter than the other two recipes. One option I plan to try in the future is using less water, like 480 grams instead of 500 grams. Compared to whole wheat, I have less experience baking with spelt.
Spelt has a mild, sweet, nutty flavor. I like the spelt flavor a little better than the white whole wheat, but both whole grains provide fine flavor to the crust.
Spelt will also make a crust that is a little thicker and chewier than a dough recipe that contains 100 percent all-purpose flour. The spelt dough is still fairly easy to stretch by hand, but it will take longer to stretch than a dough made with 100 percent all-purpose flour.
If unable to mill flour at home, the co-op sells spelt flour, which I have used in the past for bread recipes. Some grocery stores may sell a package of Bob's Red Mill spelt flour.
Making the Dough
- Mix dry ingredients together in a bowl.
- Add water to dry ingredients.
- Mix with hand whisk for 1 to 2 minutes.
- Knead dough in bowl for 1 minute to make sure water and flour are incorporated into a sticky, shaggy blob.
- Dump dough on counter and cover with bowl for 20 minutes. This rest period is known as autolyse where flour absorbs water and gluten strands develop.
- Knead dough for 5 minutes on the counter. ( Note: the spelt flour version which produces a wetter dough may require 7 or 8 minutes of kneading.)
- Place dough in a large Pyrex bowl or something similar that was lightly oiled with olive oil and cover with plastic.
- Let dough ferment at room temp for around 2 hours. (1.5 to 2 hours in a warm house and 3 to 4 hours in a cold house.) The fermented dough should at least double in size. It will probably triple in size. It will be large and airy. The fermentation time also depends upon whether you use refrigerator-temped water or room-temped water. Cold water will increase the fermentation time required.
- After fermentation, lightly oil the counter with olive oil and dump the dough onto the counter.
- Shape into one mass and divide it equally by size or weight into 4 pieces.
- Now it's time to shape or fold each piece of dough into a ball, which is tough to explain. After dividing the dough into 4 pieces, each piece of dough may exist in an irregular triangle-like shape. I pick up the ends and edges of the dough blob and bring these edges toward the center. Imagine a basket ball resting in the middle of a blanket, and then picking up the blanket at the edges and gathering the edges and corners toward the middle. With the edges of the dough stretched and gathered toward the middle, I pinch these dough edges together to seal them up. Then I place the dough seam side down and cup my hands around the dough and shape the dough into a round by moving my hands in opposite directions. The hands will shape the dough ball horizontally while at the same time pulling the dough downward toward the underside of the dough. This tightens up the dough on the outside. The dough is forgiving. This does not have to be perfect. Just shape each blob of dough into a ball that's the size of a tennis ball or baseball.
- Set the dough balls seam-side down on a lightly-floured counter or onto a lightly-floured board. Lightly flour the tops of the dough balls and loosely cover them with plastic. The flour should prevent the dough from sticking to the plastic.
- Let dough balls proof at room temp for 1 to 2 hours, depending upon the house temperature. The dough balls will dramatically increase in size while proofing.
- If not baking soon after proofing, then wrap the dough balls in plastic and place in a plastic bag or container and set in the refrigerator. The refrigerated dough will be good to use for the next 1 to 3 days. When it's time to use, remove from frig and allow dough to warm at room temp for at least an hour. Overnight refrigeration may help the dough develop more flavor, but I cannot tell a difference. It's fun to bake at least one of the freshly proofed dough balls immediately after proofing because the dough is so airy. The crust bubbles up more when baking immediately after proofing, but dough that has existed in the frig for two or three days also makes excellent pizza.
Baking
- Place baking stone on rack in oven. I use the lowest or second lowest rack level.
- Preheat oven to at least 500 degrees for 30 minutes with the stone in the oven.
- Flatten one proofed dough ball into a saucer plate-sized disk.
- Drape dough disk onto the backs of the knuckles of both hands.
- Slowly stretch and work the dough with the backs of the knuckles.
- You can also grab the dough along the edge and let gravity stretch it. Keep working around the dough to form the desired shape and to keep it relatively the same thickness (or thinness for this pizza.) The dough will get so thin in some areas that you can see light through it. If a hole forms, pinch dough together and let it rest a bit on the counter and then resume shaping.
- Scatter flour onto a wooden peel. This allows the dough to slide easily from the peel to the stone.
- You can stretch the dough some more on the wooden peel. The dough will spring back some. I try to shape the dough so that it's a little thicker around the outer edge.
- Add a thin layer of sauce. Keep the sauce thinner in the middle. Leave about an inch of sauce-free area along the outer edge of the dough, so that the dough can bubble up.
- Add chunks of fresh mozzarella cheese. This is not the shredded cheese purchased in a bag. Fresh mozz is usually shaped like a small barrel and wrapped tightly in plastic. You'll have to slice or tear chunks of this mozz. Deb makes ricotta cheese, and if we have some on hand, I'll use this instead of mozz. We discovered a local farmer, "Turkey Foot Creek,":http://turkeyfootcreek.com/ who makes goat cheese, and sometimes, we use this on our pizza instead of mozz or ricotta. May 2014 update: I don't use mozzarella cheese anymore. I use Deb's homemade ricotta cheese, or Turkey Foot Creek plain chevre goat cheese. I can buy Turkey Foot Creek cheese at The Anderons, Phoenix Earth Food Co-op, and the Toledo Farmers Market on Saturday mornings.
- Drizzle or pour on some excellent "finishing" type of olive oil.
- Sprinkle on some coarse sea salt.
- (Add any other ingredients that you would like. I keep it simple and primarily use these few ingredients. We grow eggplant in our garden, and when it's available, I'll place thin slices of eggplant on our pizza.)
- Check to make sure the pizza still slides easily on the wooden peel. If not, gently lift dough and add more flour. It's frustrating when the dough sticks to the peel.
- Slide dough onto stone. This is tricky to do with the smaller baking stone, since sometimes my dough will be as long or even longer than the stone. This is where having the larger pizza stone helps a lot.
- Bake at 500 degrees for 7 to 10 minutes or when you think it's done.
- The outer edge should bubble up, and some charring may occur, which is nice.
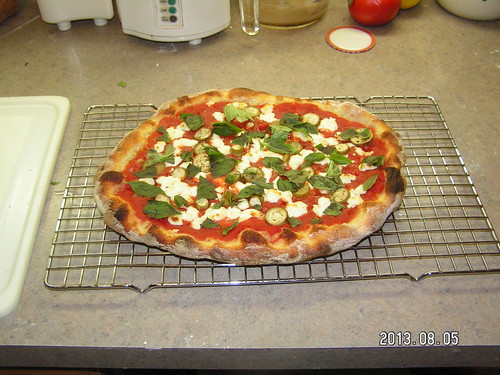
- When done baking, place pizza on a cooling rack, and immediately add the fresh basil leaves if available. Don't places basil leaves onto the pizza prior to baking, since the high heat will shrivel the leaves to almost nothing. The pizza surface is still plenty hot enough after baking that the fresh basil leaves will "cook" a little. We maintain a basil plant outdoors during the warmer time of the year.
- After at least five minutes of cooling, cut and enjoy. Depending upon the dough recipe and how you stretched the dough, the crust may be credit card thin in some areas. The baked crust will be a bit firmer and thicker near the outside edge and a little floppy toward the center.
Sauce
In the late summer and fall, Deb makes and cans a fantastic marina sauce that we use for pasta and pizza. It's my number one sauce choice for pizza.
Homemade sauce is best, but a quick sauce idea is to buy a can of San Marzano Crushed Tomatoes. The can will have a blue-purple band. The whole tomato version will have the green band.
Open the can and spread the crushed tomatoes on the dough. That's it. Straight from the can to the dough.
Depending upon your taste preference, you may not need to enhance the sauce, since olive oil and sea salt are used as toppings. But experimentation is fun too, such as cooking the sauce down a little in a pot with added herbs, spices, honey, etc.
Photos

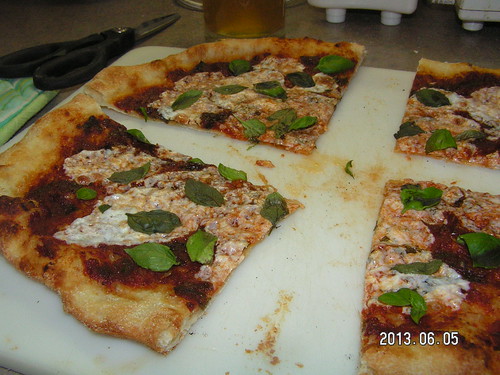
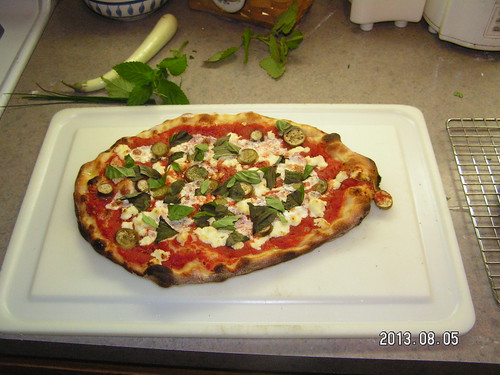
Eggplant, ricotta, and mozzarella.
No mozz on this one.